

1. Contents:
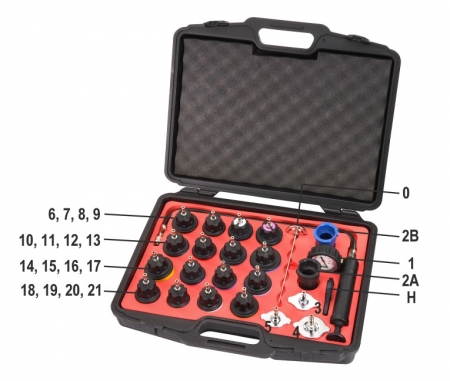
1.1 Specification- Radiator Pressure Tester:
2. Instruction of radiator pressure tester
2.1 check leakage in radiator system with radiator caps (material-Nylon 66)
Step 1: Remove the original radiator cap while the engine is cold.
Step 2: Choose a test cap suiting the connection type onto the radiator. Screw the cap onto the radiator opening(Fig.1).
Step 3: Connect the pump to the test cap through the quick coupling at the hose end.
Step 4: Pump until pressure is approximately 10~15psi(Fig.2). If the gauge pointer perfectly efficient; if the gauge goes down and no fluid discharges can be located, check whether the engine head gasket is worn. (CAUTION: please avoid the pressure up to the 35psi)
Step 5: Finally, release pressure through the button next to the quick coupling, and put away the device, after removing any fluid or dirt.
2.2 Check leakage on original radiator cap
Step 1: Choose the #2A or #2B with available steel radiator.
Step 2: Work the hand pump for few times, and then check the gauge reading for testing leakage. (Fig. 3)
Step 3: Follow the pressure standard shows on original radiator cap.
.jpg)
1.1 Specification- Radiator Pressure Tester:
| No. | Radiator Cap Application |
|---|---|
| 0 | Thermometer |
| 1 | Pressure Testing Pump with Gauge |
| 2A | Connector R123/R124(Black color) |
| 2B | Connector R123/R125(Blue color) |
| 3 | Mercedes Benz(w123, w126, w124, w201), GM(Buick) , Jeep |
| 4 | Peugeot, Subaru, Chrysler, Acura, GM(Nova, Spectrum, Sprint), Mitsubishi, Nissan, Mazda, Toyota, Infiniti, GEO, Suzuki, Isuzu, Mercedes Benz) |
| 5 | Honda, Toyota, Suzuki, Mitsubishi, Chrysler, Acura, Lexus, Chevrolet, Dodge, Eagle, Geo, Isuzu, Mercedes Benz |
| 6 | Mercedes Benz, GM, Cadillac, Daewoo, Ford, Jaguar, Jeep, Land Rover, Mercury, Pontiac, Porsche, Saab, Saturn |
| 7 | Volvo, Saab, Sterling, Citroen, Renault, Fiat, Alfa, Jeep, Mini, Peugeot |
| 8 | VW(Vento, T4, Passa-1996, Golf, Beetle, Sharan) |
| 9 | Audi(A4, A5, A6), BMW 345, VW(Passa-1997-2002), Porsche (Cayenne) |
| 10 | BMW (E46, E36, E34, E39, E38, E32, E90) |
| 11 | Audi , VW |
| 12 | Ford Mondeo, International, Land Rover, Opel, Ssangyong motor |
| 13 | Mercedes Benz(C-class, E-class, S-class, W140, W220, W124, W210, W211, W215, W216, W221, R230) , Chrysler |
| 14 | Ford Mondeo, Focus (C-MAX03) |
| 15 | Mazda (M3) , Ford |
| 16 | Mercedes A-class (W168) |
| 17 | BMW E60, E63, E64, E65 |
| 18 | VW Sharan 1.8T2.8 |
| 19 | Toyota-Rav4, Previa |
| 20 | SAAB |
| 21 | Lincoln, Mercedes, Mercury, Oldsmobile, Pontiac, Satum, Buick, Cadillac, Chevrolet, Ford, GMC, Hummer, International, Jaguar, Land Rover |
| H | Handle |
2. Instruction of radiator pressure tester
2.1 check leakage in radiator system with radiator caps (material-Nylon 66)
Step 1: Remove the original radiator cap while the engine is cold.
Step 2: Choose a test cap suiting the connection type onto the radiator. Screw the cap onto the radiator opening(Fig.1).
Step 3: Connect the pump to the test cap through the quick coupling at the hose end.
Step 4: Pump until pressure is approximately 10~15psi(Fig.2). If the gauge pointer perfectly efficient; if the gauge goes down and no fluid discharges can be located, check whether the engine head gasket is worn. (CAUTION: please avoid the pressure up to the 35psi)
Step 5: Finally, release pressure through the button next to the quick coupling, and put away the device, after removing any fluid or dirt.
2.2 Check leakage on original radiator cap
Step 1: Choose the #2A or #2B with available steel radiator.
Step 2: Work the hand pump for few times, and then check the gauge reading for testing leakage. (Fig. 3)
Step 3: Follow the pressure standard shows on original radiator cap.